Have you ever looked around your home and thought that you have a lot of unwanted clutter that you need to get rid of? Perhaps you’re doing your yearly spring cleaning and come across things you forgot you even had but haven’t needed or used in years.
When you first moved into your home was just an empty shell waiting to be decorated and filled with precious memories and possessions. In much the same way, when you first buy our laptop or computer, it comes as a clean slate just begging to be filled with all your favorite things.
As the years go by, though, you may find that our hard drive becomes cluttered; your computer is running slower and taking longer than usual to do things — more than likely even using an increasing amount of power than it used to before.
Generally, it is always easier to work and be relaxed when everything is ship shape and organized. It’s also easier to find things when you know just where to look for them, instead of having to hunt around for hours only to find it is in the very last place you look.
The same is true when it comes to our devices and Windows computers. When you need to find a specific file or photo but have no idea where on earth it may be, it’s high time that you bite the bullet and get your PC cleaned up and organized so that you won’t need to waste time searching for something again.
There are numerous ways to organize and clean up your Windows PC and we’re going to discuss seven of the most tried and true ways in which to do so.
1. Delete Old Apps, Programs and System Files
As with most things in life there is a right way and a wrong way to do things. Most of the times when it comes to computers, its best to find the right way to do things as this ensures that you don’t have to come back and do it again at a later date.
When getting rid of old applications, programs and system files, it is definitely best to do it right the first time around and then to make a habit of cleaning out at least once every few months to avoid there being a buildup of clutter that becomes unmanageable.
To get rid of old applications you can’t simply delete them as this causes problems for your Windows pc. You need to head on over to Settings (the cog shaped icon in your Start menu) and then left-click on Apps.
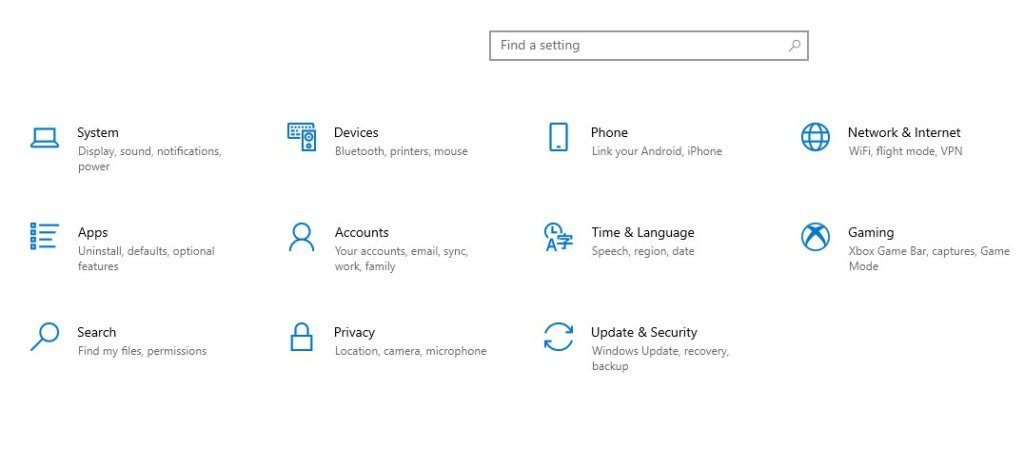
In the left-hand pane left-click on Apps and Features and then in the right-hand pane you can scroll down until you see the programs you wish to get rid of. Next you will left-click on the program and then on the Uninstall button and, when prompted, click on Okay or Uninstall.
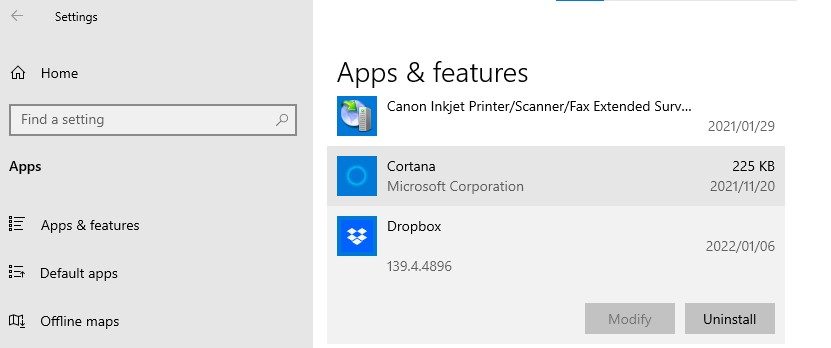
Once the program has been uninstalled it will no longer appear in the list. This is the correct way to get rid of unwanted programs or applications. If you simply just delete it off your desktop then it won’t actually be gone, it just won’t be on your desktop anymore.
To get rid of old system files you will need to go back to Settings and then left-click on System and then in the left-hand pane click on Storage. When you left-click on Temporary Files in the right-hand pane it will scan your computer and then allow you choose which temporary files you would like to delete. Once you have ticked the check boxes for the ones you want to delete, you can then go ahead and left-click on the Remove Files button.
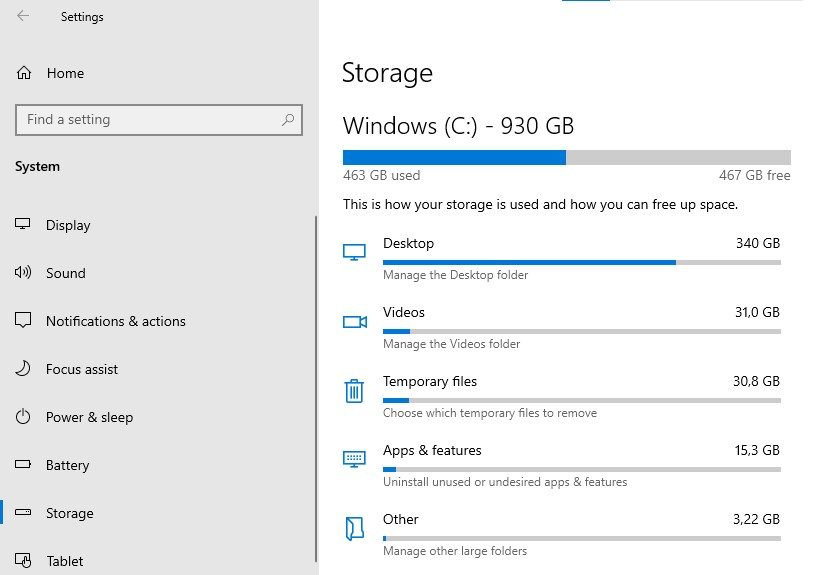
It may take a few minutes to finish clearing – depending on how many months or years of temporary files you have that need clearing. This is another reason why it’s best to do this purging, if not once a month, then at least every second or third month.
2. Delete All Duplicates
While doppelggers are cool in human form, they’re not so cool when they’re taking up space and memory on your hard drive. Unfortunately, these doppelggers become more and more frequent as the months go by; you visit more websites or download more files or photos etc.
Without your realizing it your computer ends up storing duplicates of certain things and this ends up taking up space on your computer and helping towards slowing it down.
The easiest way to get rid of duplicates of any kind on your computer is to use CCleaner. Most Windows computers come with this program already installed, but if you don’t have it on your computer then you can just download the free version and follow the prompts to install it. Once you have it, you can open up the program and then left-click on Tools in the left-hand pane.
Check the tick boxes that say Name and Size and then under the Ignore tab, make sure that you check the tick boxes System Files and Hidden Files. In order to scan the full hard drive you need to make sure you tick the box C: Drive.
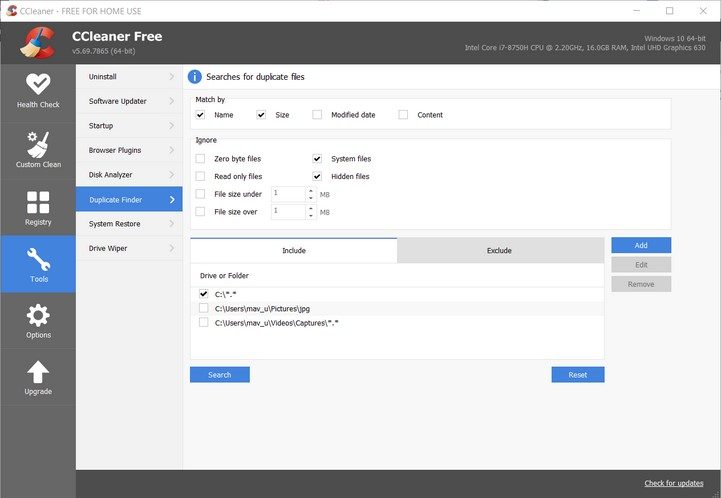
You can then left-click on Search to start the scan. Once the scan has finished running you can then go through the list and tick the duplicated files which you wish to delete.
Should you wish to delete all the duplicates, you can right-click on one of the duplicated files you have checked and then left-click on Select All. This will then select all of the duplicates and you can then left-click on Delete Selected. If you have a lot of duplicates, you may have to wait a while for it to finish running.
3. Empty the Downloads and Trash Folder
Now that you’ve cleared out a few things already, it might be time to delve into that downloads folder. Oftentimes we download things but never actually look at them after the initial download. Perhaps you even downloaded something by accident.
Whatever the case, the downloads folder can become excessively cluttered and in need of clearing out so it’s time to head on over there and do some cleaning out.
Open File Explorer and then left-click on Downloads in the left-hand pane. Go through the files that are in the right-hand pane and if you don’t need them, delete them. If you think you will need them later on then you can cut and paste them (CTRL and X to cut and CTRL and V to paste) into a folder on your desktop (or wherever you keep your folders).
Once you have deleted all the unwanted downloaded items, you can then head over to your desktop and your Recycle Bin which is pictured by a trash can icon. In order to empty the recycle bin you can right-click on it and then select Empty Recycle Bin.
This will permanently delete all the files.
4. Clean Out Your Browser
Whenever you open up your web browser it starts to accumulate cookies (not the nice yummy kind) and filling up the cache. In order to keep this from becoming a problem that will slow down or hinder your browsing experience, you will need to regularly clean out your browser.
To do this, open your web browser and then left-click on the three dots or three lines in the top right-hand corner of the page. Select the Settings option and then left-click on Clear Browsing Data in the right-hand pane.
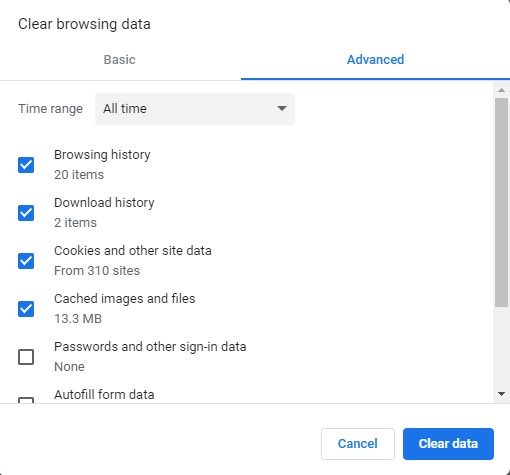
Select Advanced and tick the boxes that you want to clear out. Once done you can left-click on Clear data and then when it has finished running you can exit your browser. It would be a good idea to do this on a regular basis.
5. Organize All Folders
Having all your folders named correctly will help in being able to find what you are looking for at the drop of a hat. It is important to have conformity throughout so that you don’t get confused later on when you need to file something away.
Every person is different so how you do this is entirely up to you, but it is something you really do need to do. Keeping all your photos properly named and in folders that are named according to date or place etc will be much simpler than having everything all over the place. Added to all this it is even better if you can have these folders sorted in such a way that you don’t clutter up your desktop.
6. Run Malware and Virus Scans
No matter what you use your computer for, whether it is for work or pleasure or even as a tool for the children for remote schooling, it is always a good idea to run a regular malware and virus scan. With so many online crooks and creeps roaming the dark web you really can’t be too careful. Make sure that you have reliable anti-virus and anti-malware software installed and that you run regular scans.
All you need to do is open up your anti-virus software and then left-click on Scan Now. It may differ slightly from program to program but overall they will be super easy to run and you can just close the program once it has finished running. Should the program find any problems, they will prompt you to solve the issue, which can be done with a few simple clicks of the mouse.
7. Update Your Windows Software
Last, but not least, regularly check that you have the latest Windows Update installed. To check whether you need to install an update navigate on over to Settings then left-click on Update and Security. Next you will select Windows Update in the left-hand pane and then left-click Check for Updates in the right-hand pane. Should there be an update which you need to install you can then click on Download and Install.
By using these easy and reliable ways to clean up and organize your Windows PC you will find that computing life will be simpler, giving you time to spend doing other things instead of wasting time searching for files or photos, waiting for a web page to load or dealing with a computer that keeps crashing because it is overloaded with unnecessary files and programs.
As always, if you need any additional help with the decluttering and organization of your Windows PC, consider reaching out to HelpCloud technicians for remote support.
