Table of Contents:
Almost everyone who’s ever used a computer has seen it happen …
Maybe a drive failed. Maybe someone permanently deleted a file they shouldn’t have. Or maybe the system files got corrupted. Whatever the case, there’s no easy way to recover the files that you had been counting on. It’s time to restore from a backup. You do have one, right?
Backups are absolutely essential. Any time you don’t back up your data, you’re flying blind without any parachutes on the plane. You’re leaving yourself without any margin of error. If you have a catastrophic hard drive failure, a file corruption incident or an accidental deletion you have no way to go back to the way things were.
Plenty of people have run into problems with their computers because of not having sufficient backups. Experienced IT people recommend having three backups: at least one locally and one offsite. With cloud storage, your offsite storage for your most important files is taken care of. You need to make sure the rest is done too though.
Thankfully backing up your system is a lot easier than it used to be, and it’s not hard to make a backup of the things that really matter to you. There are multiple ways to make backups now, and we’ll help you understand the best way to back up your computer.
The Hardware Side of Backups on Windows 10
Windows 10 has a few different ways for you to back up your files. Before you begin, you’re going to want an external drive to connect to, preferably with enough space to handle your entire main drive’s capacity. If you’re not backing up your entire main disk drive you can get away with less, but a bigger backup drive means you have more options available.
You can also back up certain things to the cloud, in particular through OneDrive, which is integrated with Windows in a way its competitors like Google Drive and OneDrive aren’t. OneDrive doesn’t require you to have an external drive, as it’s all online. If you have an Internet connection, anything you save on OneDrive will be available from the OneDrive account, not just your local machine. So even if your computer dies you can still pull down your files from OneDrive.
There’s also a third option: another internal drive. If you’ve built your own computer, you may have an extra internal drive (and probably won’t be reading this guide). Some computers you buy will have an extra drive but most won’t — you should at least check. Once you’ve made sure you have the hardware available, you can start setting up your backup options.
Windows 10 Backup Options
Windows 10 has several backup options available. These may be different than what you’re used to on older systems. With newer restore options, backups don’t always have to be as all-inclusive as they used to be, so you can back up less data and still get a good system restore if something bad happens.
Windows 8 introduced the File History tool, and with Windows 10 it’s still the main backup tool available. It doesn’t back up your entire system. Instead, it lets you choose which files and folders you want to back up. You can save your pictures, documents and other folders that are important to you so you don’t lose those pictures of your kids or grandkids.
It doesn’t just back up old files, though. It also keeps versions of old files you can restore. Say you were working on a document and accidentally deleted some text you wanted back. With this tool you could restore an older version that had the section you got rid of.
Once you set File History, you can basically forget about it. It will do its job in the background. If you want to add a folder to its backup list you can, but it will always keep backups of the folders you choose.
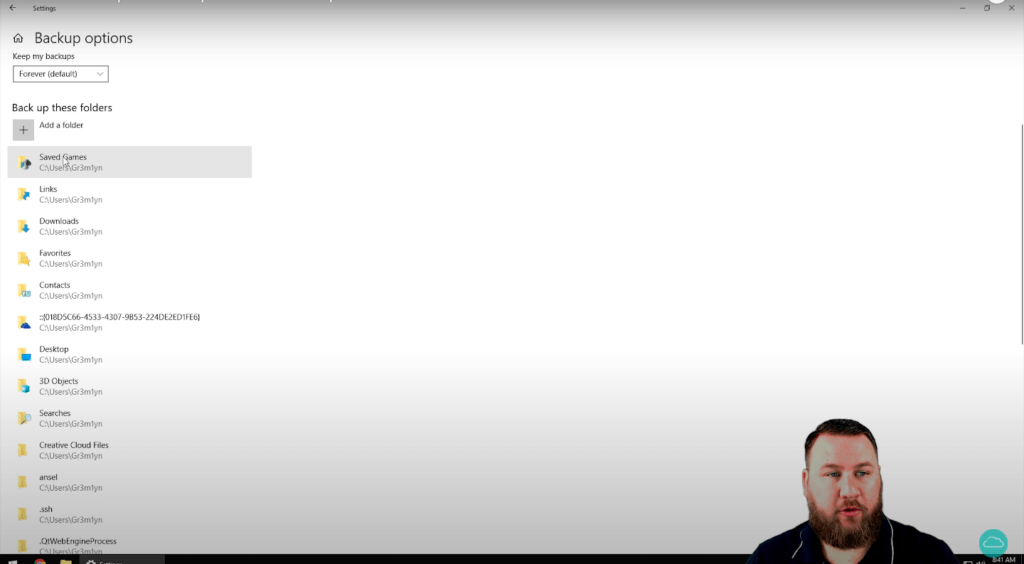
To get to File History, you can open your backup settings by opening your Start menu and typing “backup” in the search bar. This will bring up “Backup Settings” as the top option. Click “Add a Drive” to choose one of your connected drives to back up to.
You can then adjust settings as you like from there. Click “Add a folder” to add a folder to be backed up through File History.
You can also choose folders to be excluded at the bottom of the screen, and you can change the backup interval at the top of the screen. The default is once an hour, but you can adjust to anything up to daily or all the way down to every ten minutes.
You can also choose how long to keep your backups from a menu in the same area. Depending on the size of your drive, you may want to lower that interval. If you have a large enough drive and a low enough volume of files you’re backing up you’re probably fine, but if your drive is small you’re probably going to want to delete backups periodically.
If you decide at some point in the future that you want to use a different drive for backups, you can click the button “Stop using this drive” at the bottom of the screen and change to a different drive. You only need to do this if you’re switching drives, and that shouldn’t happen often.
File History is the best option for most people.
But if you want to do a more in-depth backup you can use some different tools.
In-Depth Backup Options
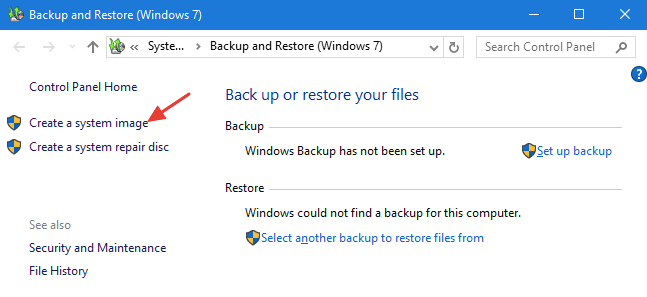
Backup and Restore was the old option that Windows had, and it was added back to Windows 10 after being removed. You can find it by typing “backup” in at the Start menu and choosing “Backup and Restore (Windows 7).”
From this window you can create a disk image, which allows you to restore your system entirely. Unlike File History, this disk image or system image means you can restore your entire system at once. When you back up using the system image, it copies every single aspect of your system to the drive you’re using.
This has some advantages and some disadvantages. A small system restore when some files get corrupted or something is fine with File History. You can use the other backup tools that come with the system to get it back to normal and add back your files with the File History tool. But if you have a more catastrophic failure and the whole disk is gone, you can get it all back immediately with the Backup and Restore system image.
You can keep several disk images if you want, if your drive has the space to store all your computer’s information. That allows you to capture several snapshots of where your computer’s state was at that point in time. You can also make a system repair disk when you do this so you can restore your system files more easily. Once you’ve made a disk image, you can choose to restore from it if you have a catastrophic failure.
Recovery Drives
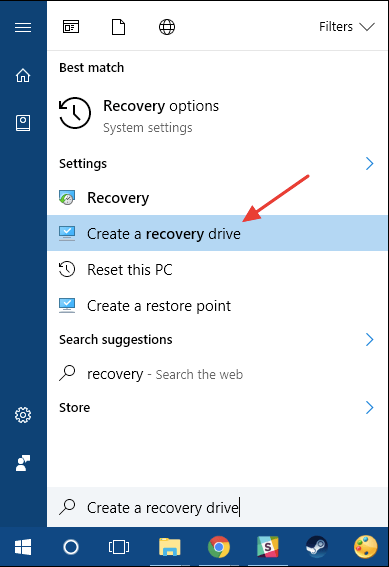
You can also use a USB drive to create a recovery drive. Using a separate, smaller USB drive is a good idea. You can buy a small USB stick, set it up, label it and put it in a drawer somewhere just in case you need it. To set up a recovery drive, type “Recovery” in your Start menu and choose “Create a recovery drive.”
Follow the wizard that pops up with your USB drive plugged in and it will copy some essential system files across. You can then remove the drive and put it in a safe place.
This drive isn’t useful for restoring any of your own files, but it will help you repair a damaged installation of Windows if something happens to corrupt your installation. You can connect it, choose to boot from it at startup and reset your PC to its original state.
This is where your File History backups and OneDrive can come in handy. If you use this recovery disk to get your Windows installation back to normal, you can get your files back from your File History backup and your OneDrive. Otherwise you might lose some information.
The Reset option on Windows 10 allows you to choose whether to keep your files or remove them. If you’ve done your backups with File History you can opt for the deep clean, otherwise you can do the “keep files” option to keep your personal files from the default locations.
Creating Backups
Creating backups is essential for anyone who uses a computer on a regular basis. It’s not hard to back up your computer if you have an external drive. Make sure that you have a backup of your personal files and a way to restore your Windows installation if something bad happens.
Backing up your computer isn’t hard but if you need a hand with it we’re here to help. Talk to HelpCloud Technicians for remote support and we’ll get you sorted out.


