Many people are aware of how popular Apple products have become since they first appeared on the scene. Beginning with the launch of the first iPhone in June of 2007, Apple soon started rolling out devices that took innovation and technology to a completely ramped up level. When buying an iPhone or Apple device, one isn't just buying a normal smart phone or any old device, you're buying into a complete ecosystem.
The more Apple devices you use, the more they integrate into one another, with users having the ability to do more with the software and the services provided than with any other brand.
Unlike other brands, Apple users know that they can walk into any Apple store and be assured of immediate support for any issue they may have with their iPhone or other Apple products. This is yet another reason why consumers choose to invest in Apple products.
As an iPhone or Apple user, you're probably fully aware that there aren't many problems with these incredible devices, and hassles are usually few and far between. However, there does come a day when even these awesome creations may need a little nudge in the right direction or a bit of help realigning.
Preparing the Way
When that happens, it is best to set aside an hour or two when you can sit down and do the necessary. Firstly, you're going to want to prepare the way for the factory reset by first backing up your entire iPhone.
Tedious, we know, but if you don't you're going to spend a lot of time wishing you had. To backup your iPhone, make sure that your device is connected to the Wi-Fi, then go into your Settings and tap on your name and then tap on iCloud.
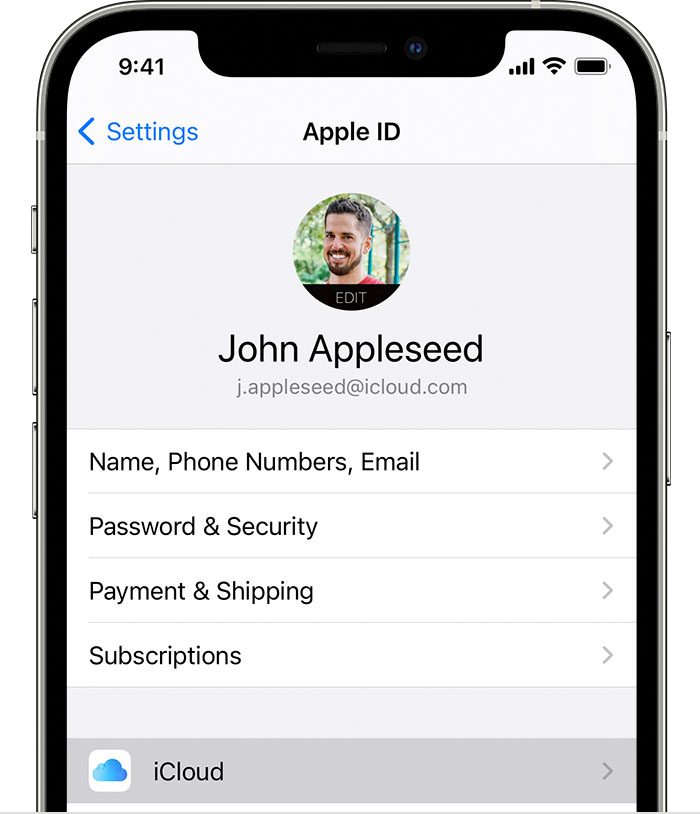
Tap on iCloud Backup and now tap on Backup Now to start the backup process. Make sure that you stay connected to the Wi-Fi throughout this process; otherwise it will not be able to complete.
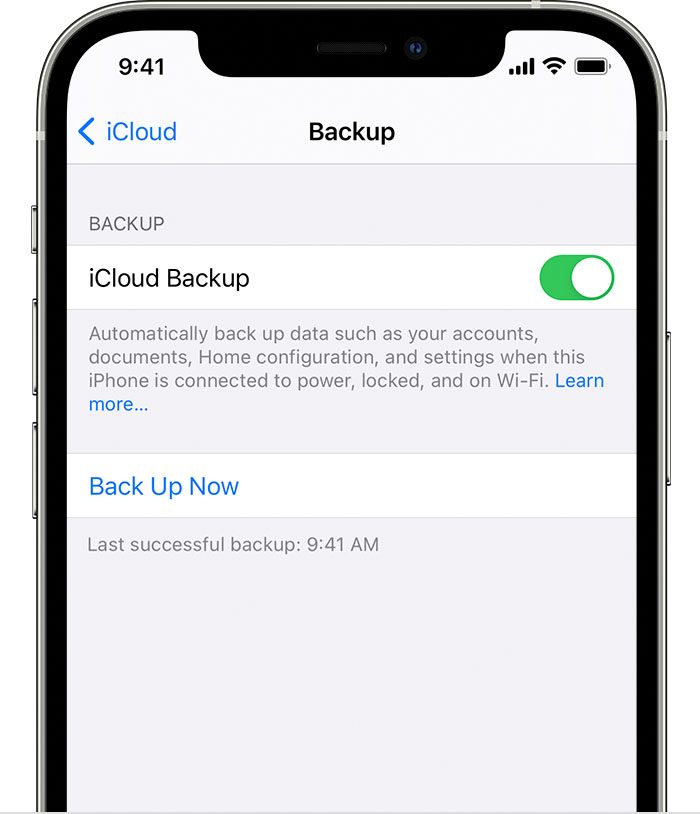
Under the Backup Now tab you will also be able to see when you did your last backup. You can also backup your iPhone using your Mac or Windows computer. Once the backup is completed and all your data is secure, you can then move forward to start with the factory reset.
Performing the Factory Reset
A quick note as an aside before you start the factory reset, if you have any paired Apple devices such as an Apple watch be sure to un-pair it before you start. As you run the reset you will need to stay connected to the Wi-Fi so it would help if you have a strong and uninterrupted signal. You will need to have your Apple ID password near to hand if you have the Find My iPhone feature enabled on your iPhone.
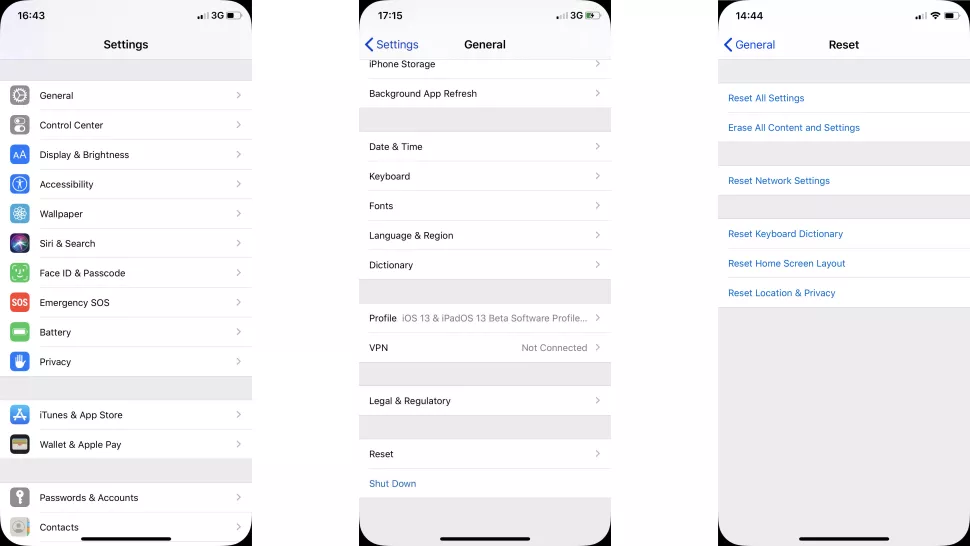
Navigate to your Settings and then tap on General. Scroll down to the bottom and then select Transfer or Reset iPhone. Next, tap on Erase all content and settings and then tap Erase now. Enter your passcode if prompted to do so and then select Erase iPhone to confirm that you want to proceed.
Should you be required to enter your Apple ID password, do so and then tap on Erase.
Once it has completed the factory reset, your iPhone will show the Apple logo and you will be given prompts to start setting up your device from scratch.
What happens if you don't have your Apple ID password for some reason? Will you still be able to perform the factory reset? Never fear, there is a way around this, but only use it if you have to.
You can connect your iPhone to your computer via USB cable and then put your phone into Recovery Mode. The steps to do this will vary from model to model although you can find the exact steps on the Support Page for Apple.
Once you have put your phone into recovery mode, iTunes will send you a notification which you will need to acknowledge by left-clicking on Okay in the message box. In iTunes, left-click on Summary and then in the right-hand pane select the option Restore iPhone. Lastly, you simply need to left-click on the Restore button to complete the process.
If you find that these options don't work for you, you could also download and install Stellar Eraser for iPhone which will do the job in a handy and efficient manner.
Why Would you do a Factory Reset?
There are a few reasons why people would want to do a complete overhaul on their beloved Apple iPhone.
- The first reason is because you're about to embark on a new Apple adventure with an upgraded and newer version of the iPhone (whether that means you are buying a new one or trading in the old one). Since you can't hand over your old device to someone with all your personal and private information on it, you need to factory reset your iPhone to ensure your privacy is protected and your sensitive data doesn't get into the wrong hands. On the flip side, if you have purchased a secondhand iPhone and you notice when you turn it on that there is still information from the previous owner on it, be an upstanding citizen and do the factory reset before you take a peek through all their private data.
- The second reason is because your iPhone, whilst still ahead of the pack in comparison to other smartphones, has an annoying habit of suddenly freezing up whenever you try to go into an application. iPhone 7 users have had some difficulty with this issue, but a factory reset should fix the problem. It could also be due to the fact that one or more of your applications have a conflict of interests.
- A third reason could be that your iPhone gets stuck on the Apple logo whilst restoring it from an iCloud backup, or perhaps whilst updating the iOS, or even after you have had to do a jailbreak. If you have been doing regular backups then you have no cause to stress as you will be able to reinstall the last backup you did once you have done the factory reset.
- A fourth, and one of the more general reasons other than wanting to sell or upgrade your iPhone, is that you find your iPhone has become horribly sluggish and that it doesn't function at its usual speed and efficiency that is the hallmark of all Apple devices.
- Lastly, the fifth reason why a factory reset is something you may be doing is that you simply want to make a fresh start and you can't be bothered to delete one application at a time. Especially since this will take a good few hours of your life when you really could have been doing something better. A factory reset is the much faster option and it will make sure that everything gets cleaned off and you are able to start fresh in earnest.
The Soft Reset vs. Hard Reset
Many people simply talk of doing a reset on their iPhone and yet there is a hard reset option (which is the nuclear version of cleaning off your phone and getting it do what you want), and then there is a soft reset (this is the option that only resets certain portions of your iPhone) which is a much milder option.
It is best to make sure you know which one you need to do because doing the wrong one (for instance the hard reset, which restores everything on your phone to factory settings and gets rid of all of your personal settings, preferences and information) could leave you needing to sit down quickly before passing out from the shock.
To do a soft reset of your phone, navigate to the Settings app and then tap on General and then you can scroll all the way down to the bottom and tap on the Transfer or Reset iPhone. On the following screen you will be faced with a few different options on how you would like to proceed with the reset and which things you would like to reset.
The first option is to reset all settings such as keyboard dictionary, home screen layout, network, location and privacy settings. Another option is to reset any one of these separately by choosing one of the other options.
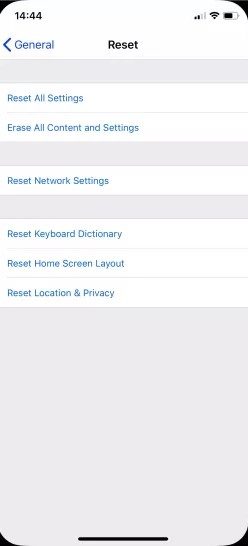
Make sure you steer clear of the second option, though, unless you feel like factory resetting your heart. Doing the hard reset, or factory reset, will make sure that your iPhone is wiped completely clean of all data, with the only apps remaining being the ones which originally came with your iPhone when you first got it. Now it is up to you to whether you want to do a backup restore (which will restore all your previous data for you) or whether you want to start from scratch.
As always, if you're needing any kind of additional help either understanding factory resets for your iPhone or carrying them out, consider reaching out to HelpCloud technicians for remote support.
