- What is iDrive and Why to Use it
- iDrive Setup on a PC or Mac
- iDrive Setup on a Android or iPhone
- Common Troubleshooting with iDrive
Regardless of whether you use a desktop computer, a tablet, a smartphone or several of these devices, there is no denying that more of your information is being stored digitally than ever before.
While this can certainly make it easier to keep things organized, there are also understandable risks that come with using digital devices. If your computer were to get a virus or you lost your smartphone, you could also lose all the files associated with that device.
For most people, their smartphone and computer hold much more than contact lists and calendar reminders. These essential tools are used to store favorite photos, family histories, journals and other items that are truly irreplaceable. When some estimate that 70 million smartphones are lost each year, it is clear that this is a fairly common problem.
Thankfully, as with most potential problems that come with the use of new technologies, there are also new solutions in place to counteract these issues.
Losing your phone doesn’t have to mean you permanently lose your photos, notes and other important files. With iDrive, you can have confidence that your information is protected, no matter what happens.
If this setup is too confusing and you’d rather have professional help then consider HelpCloud Technician by-the-hour.
What Is iDrive and Why Should You Use It?
iDrive is what is known as a cloud backup system. These systems essentially create a copy of the files, which are stored in a secure cloud system in their original format.
The idea behind a cloud backup system is that it copies everything on all devices linked to your account. So, if you have both a PC and an Android phone, you could have files from both devices backed up to the same account. This makes iDrive especially helpful for small businesses, which often need to back up several computers and/or phones.
Encryption is an important element of cloud backup. iDrive uses 256-bit AES encryption. This means that files are encrypted using a 256-bit “key.” This ensures that hackers will not be able to see what is stored in the files as they are transmitted from your device to the cloud backup system. This is actually one of the most secure digital encryptions available, and is even used for government and military applications.
iDrive archives your files into folders for each device connected with your account. This makes it easier to access the files associated with a particular device. The iDrive system even automatically recognizes changes made to files stored in your account so that it knows when to create new backups. However, old files are not deleted unless you want to manually clear them out. This will also help protect files if you were to get a computer virus.
This secure and comprehensive backup option is the best way to ensure that your files are never lost. You can share data with a secured link, just like you would with typical cloud storage devices.
Setting Up iDrive On a PC or Mac
Before you can start using iDrive for your devices, you first need to sign up for an account! When signing up, be sure to choose the plan that is right for your storage needs. The basic free account does not require a credit card and never expires. However, this only allows for up to 5 GB of storage. On average, this would allow you to back up as many as 1,667 digital photos.
Individuals who want to back up a lot of photos and videos as well as other files, will likely need to sign up for a subscription-based iDrive Personal account. One and two-year plans are available that let you store two to five terabytes (TB) of storage per year. Even for individuals with multiple devices, that should be plenty of room for backing up all their personal files.
To set up iDrive on your PC or Mac, you will need to install the dedicated app for your computer. This app is available from the iDrive website. Make sure that you are getting the right app for the type of computer you use!
Once you have downloaded the iDrive app, click on it in your download folder. It should appear as IDrive.dmg. This will begin the installation process. Onscreen instructions will guide you through terms and conditions and help you choose where iDrive will be installed on your computer. It should only take a few minutes to install the iDrive app.
Once installation is complete, click on the iDrive icon on your screen to open the app. Sign in using your iDrive account information, and you will be able to back up your computer’s files and access additional iDrive features.
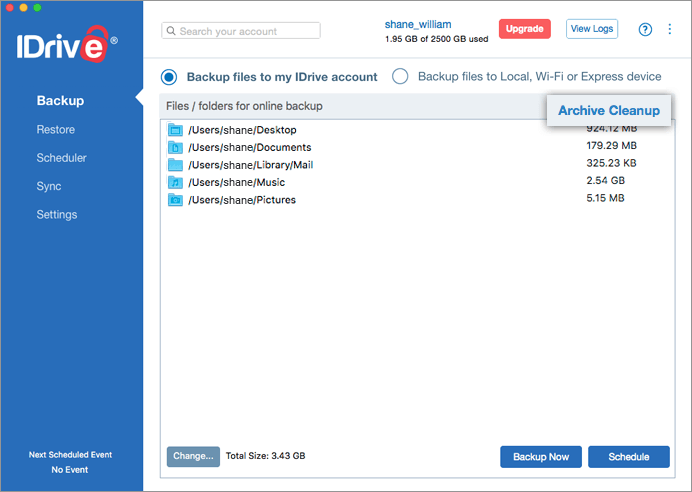
Some items will be automatically scheduled for backup when you first log in. However, you can manually adjust which files you want backed up, as well as how often you want backups to occur. Clicking “Backup Now” will run an immediate backup of selected files, or you can click “Schedule” to calendar future backups. You can also select whether to back up files to your iDrive account or to another device.
If you need to find a file, click on the “Restore” option, which will let you search for files by name. Search results will also show how many versions of a file have been backed up, as well as when it was backed up. You can restore these files to your computer or delete them from your account.
Using iDrive for iPhones and Android Devices
Using iDrive for your iPhone or Android device is a simple and straightforward process, thanks to the iDrive mobile app. After downloading the app from the App Store or the Google Play Store, log in with your iDrive account information.
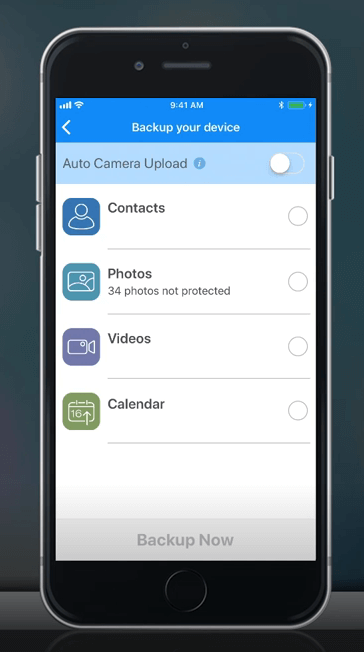
Once you are logged into the app, simply tap the “Backup Now” button to start backing up your device’s files. This will open a menu allowing you to select which files you want to back up. For example, you can choose to back up contacts, photos, videos, calendar events.
When you log into this menu, the app will also tell you how many files are currently on your phone that have not yet been backed up. A loading bar will show you the progress of the backup after you select which files you wish to send to iDrive. Once the iDrive backup is complete, you will see a small confirmation message beneath each file category stating that all files have been backed up.
The iDrive app also lets users “sync” their smartphone. This makes selected files accessible to other linked devices that are part of your account. This option also lets you open and share files that have been synced from other devices. You can also manage your sharing settings.
The iDrive app’s home screen also gives you easy access to data restoration. By tapping the “Access and Restore,” you will be taken to a list that shows all devices that have been backed up to your account.
Tapping on the devices listed will open up menus that allow you to go through the files that have been backed up. You can then go through individual folders and files to choose which files you wish to restore to your phone, or you can do a full file restoration to your device.
Additional features within the smartphone app include “Timeline,” which lets you look at all backed up photos and videos from all devices, arranged chronologically. The “People” subheading organizes your photos using facial recognition. This makes it easy to find the photos you’re looking for when restoring your favorite pictures to your phone.
Common Troubleshooting Issues with iDrive
While using iDrive is fairly straightforward, some users will occasionally encounter trouble with “quota overuse.” This means that they have attempted to back up more data than their account settings allow.
For some, the best solution will be to upgrade to an account that allows for more storage. However, your iDrive account could be getting cluttered because you have backed up unnecessary files.
One easy way to solve this problem is to select “Archive Cleanup” under the “Backup” menu on your iDrive computer app. An Archive Cleanup deletes any backed up files from your iDrive account that you have deleted from your computer. You can also set your account to run Archive Cleanups on a monthly basis by choosing “Periodic Cleanup.”
The app will present a list of files to be permanently deleted for your approval.
You can also delete files individually under the “Restore” menu. If you delete something by accident, don’t worry. It is kept in the “Trash” folder for 30 days before it is gone forever, so you can still recover the file.
Protecting Your Data With iDrive
With cloud backup support from iDrive, you don’t have to worry about what might happen to your files if something were to happen to one of your devices. With encrypted backup solutions, the information that matters most will be kept safe. If you’re concerned about the potential for losing your digital files, this is one of the best solutions available.
As always, if you are experiencing any kind of difficulty with installing or using your iDrive, consider reaching out to HelpCloud Technicians for remote support.


