Google Photos is a great tool and app, especially for those that like and are familiar with other Google products (Gmail, Google Drive, etc.). As smartphone cameras get better and better, and more photos and videos are captured with them, it is wise to have a cloud drive as a backup and storage option for your media. In this blog post we'll cover why use Google Photos, how to get and pay for Google Photos, how to create a shared album, how and why to use the Favorite function, and briefly cover other Google Photos features. We hope this blog post can help you begin using the tool and have no trouble using it on both your smartphone and on your desktop or laptop computer.
HelpCloud members should remember to reach out to support if you have questions or issues with Google Photos.
Why Use Google Photos
Access Your Photos from All Your Devices
My favorite reason for using Google Photos is that it automatically backs up photos that I take with my phone to a cloud drive. That means I have two versions of the photo. One on my phone and one saved in the cloud. If you have trouble understanding what the cloud is, learn more here. But basically, the files are stored on a host server somewhere and allows you to access the contents on your account through an internet connection. In summary, you take a photo on your phone, Google Photos saves it to their cloud drive, and you can then access that photo from any internet connection through your Google Account. Take a photo, jump on your desktop and you can view your photo online.
Sharing is Simple
Gone are the days of taking a photo on your phone or camera, uploading those photos to your computer, then creating 6 different emails to share and send your photos to families and friends! With Google Photos you can share a photo directly to a contact or create an album with lots of photos and videos and they can view it whenever they want. You can also share directly to social media or other nearby and trusted devices with Google Photos. Share however you prefer!
Free Up Space on Your Smartphone
Smartphone cameras have been unbelievably good. High quality and full of neat features. This also means photo and video file size has increased. Smartphones haven’t necessarily become better with regard to allocated storage space (debately, this is intentional). This creates a problem where you run out of space quickly on the phone. As much as you’d like to always have your photos on your smartphone, sometimes you have to delete them. But instead of deleting and losing that media, upload to a cloud drive like Google Photos. Learn more in this Google Photos Help page on how to make sure you’ve properly offloaded your photos and videos to your Google Photos account.
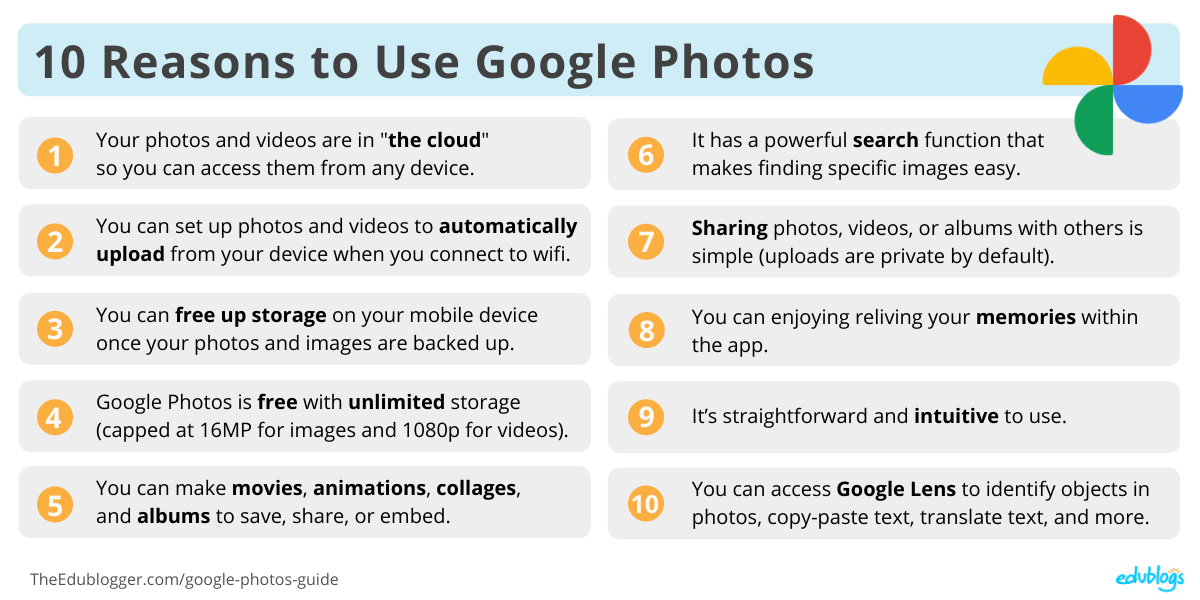
In a very well written article, learn even more about Google Photos here. Included is this great image for reasons to use Google Photos:
How to Get Google Photos (Plans and Pricing)
The caveat with Google Photos is that you'll have to have or create a Google account. If you don't want a Google account, then this service is not for you. If you do not have a Google account, you will be prompted to create one after downloading the app or when visiting the web version. If you're installing the app on a smartphone or tablet, use these links for the app from the iOS App Store or Google Play Store. To access the service while on a desktop or laptop, here is the web version of Google Photos.
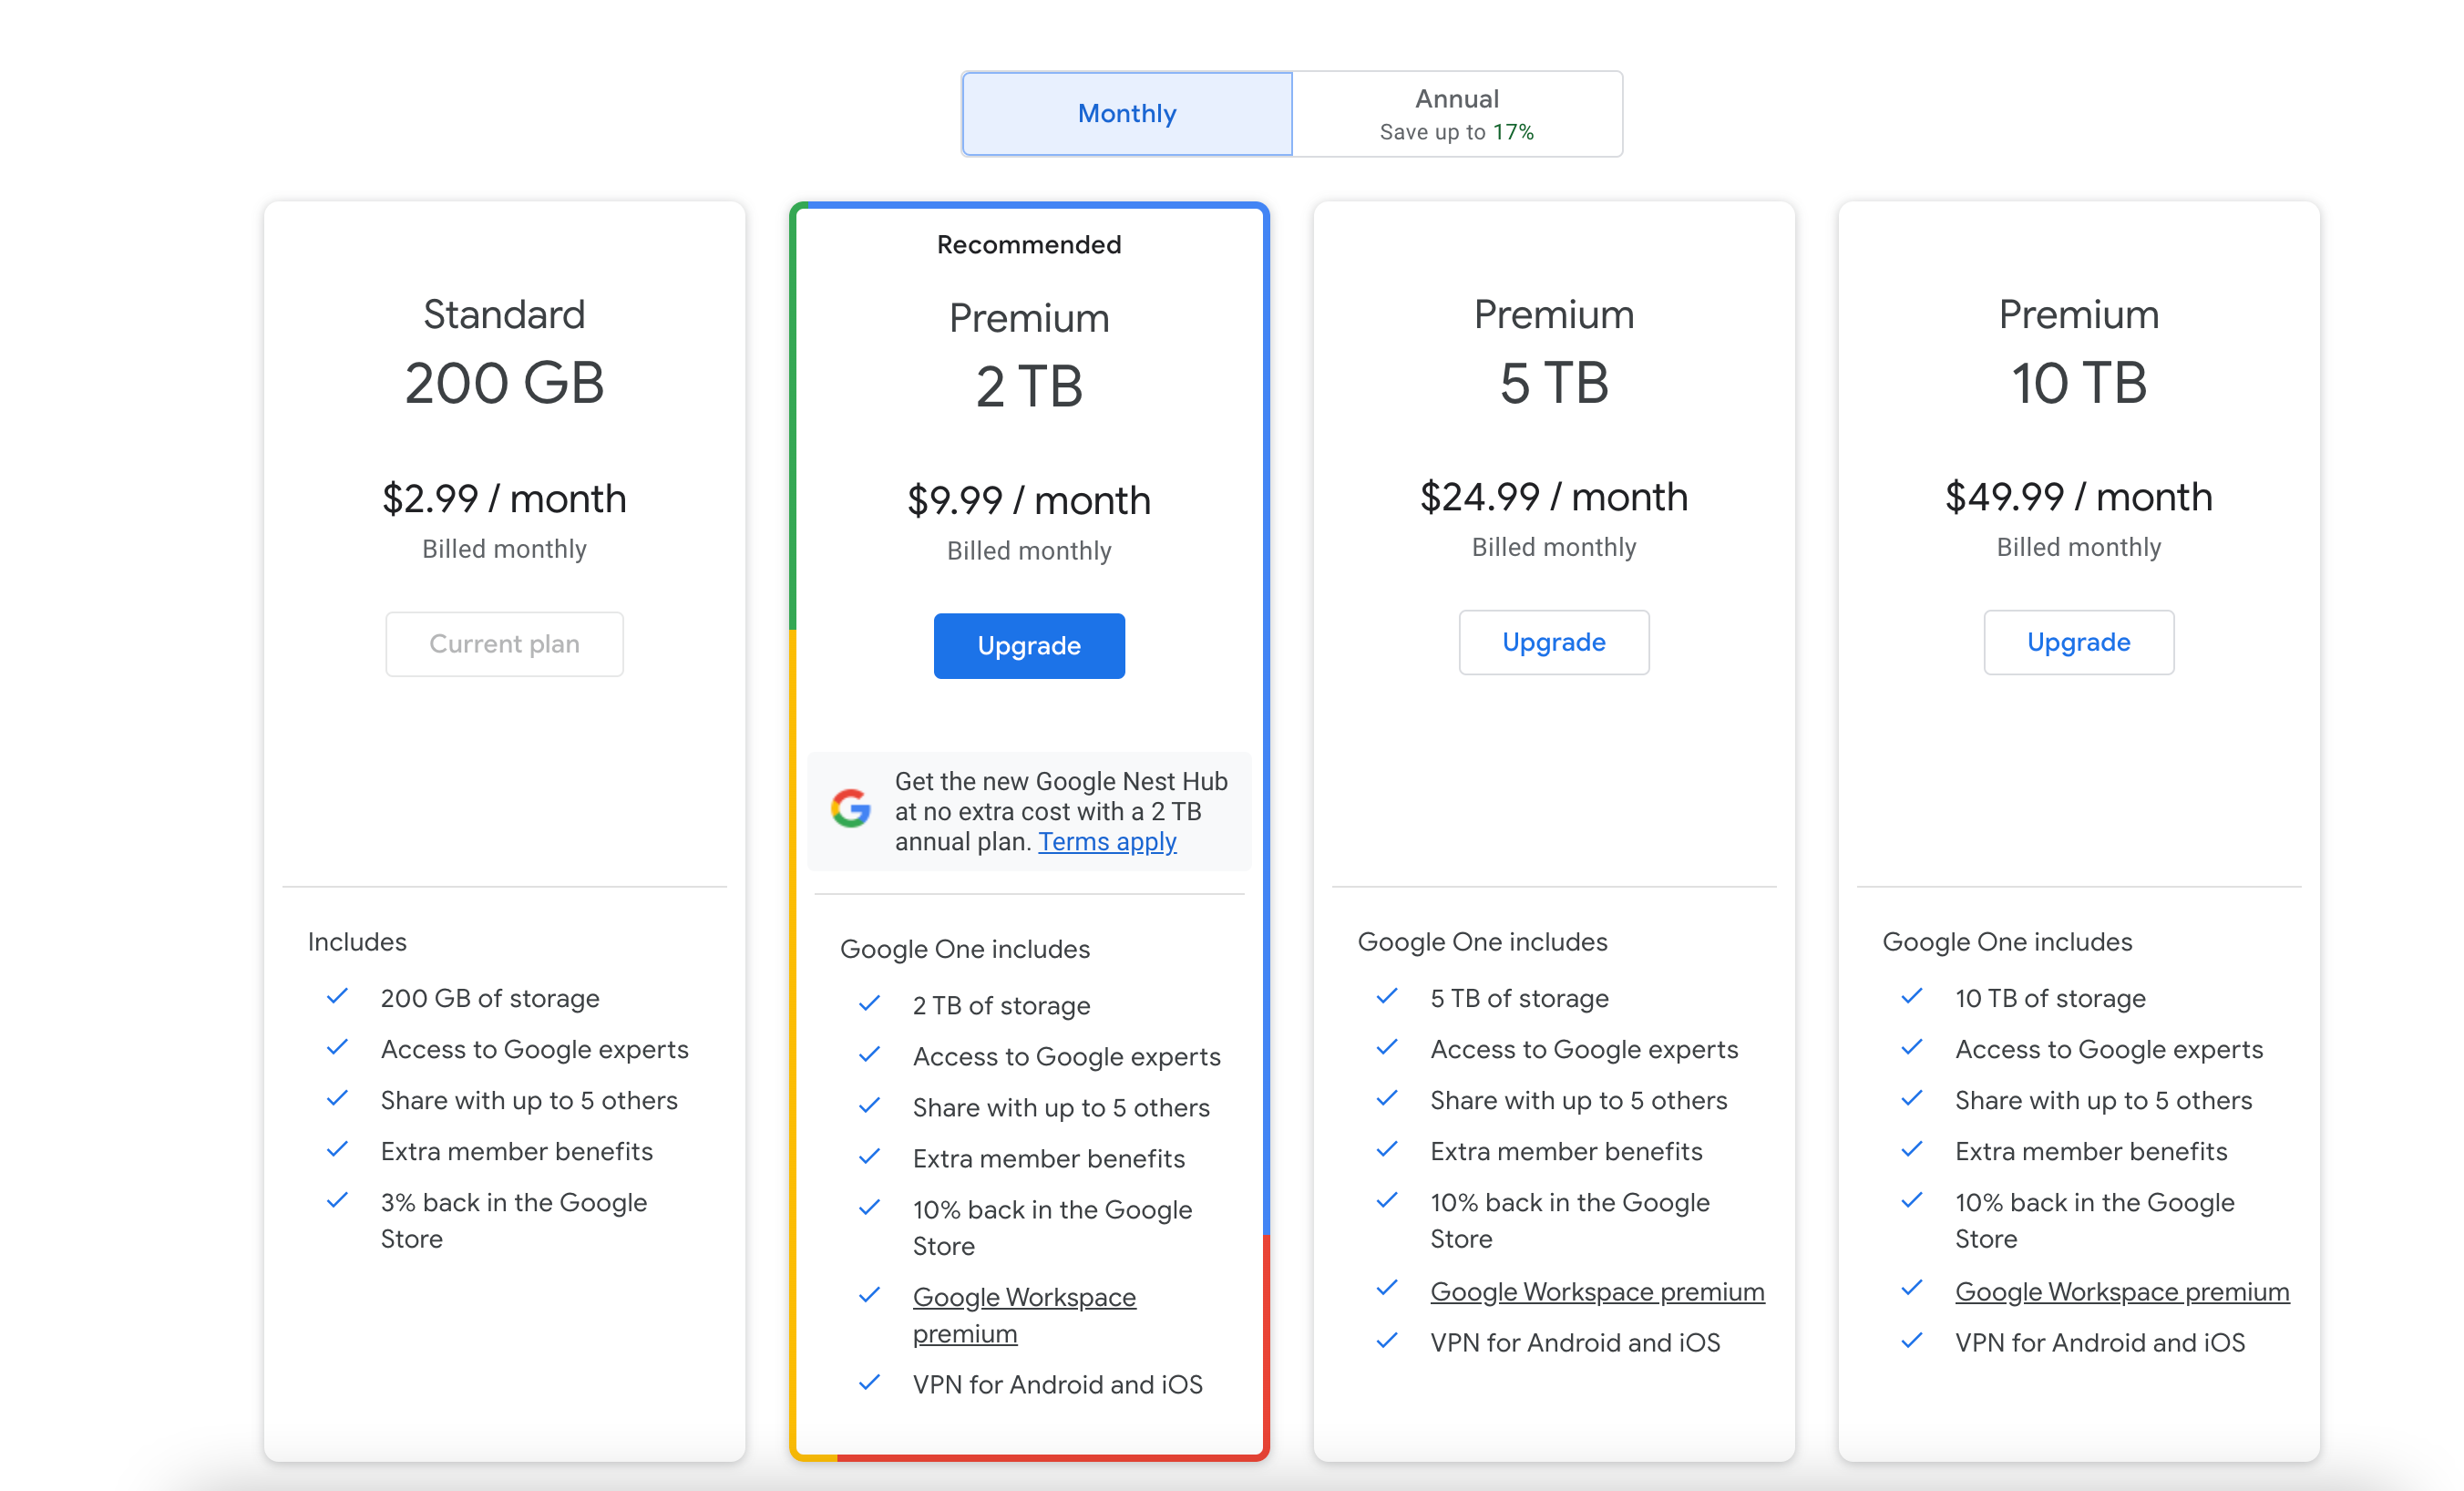
Google Photos no longer has their free unlimited storage version. But it does come with your Google Account and uses the standard 15 GB of free storage. But you’ll find that 15 GB will quickly be used up between your Gmail, Google Drive, and Google Photos. To upgrade your storage you do it across all Google services using "Google One".
Here’s a snapshot of Google One's plans and prices:
How to Share Photos Using Google Photos
Sharing a Photo (or photos) and Movies without Creating an Album
This option is great for when you just want to share a one-off photo(s) or a video on a whim. Using these same steps you can also post a photo from Google Photos to social media. These steps are for using Google Photos on an Android smartphone:
- Select and hold the photo you want to share until there is a checkmark in the upper left of the photo and the share functions pop-up in the bottom of the app.
- At this time you can select additional photos and videos to share at the same time
- In the lower part of your screen you’ll see sharing options. Click the Share option:
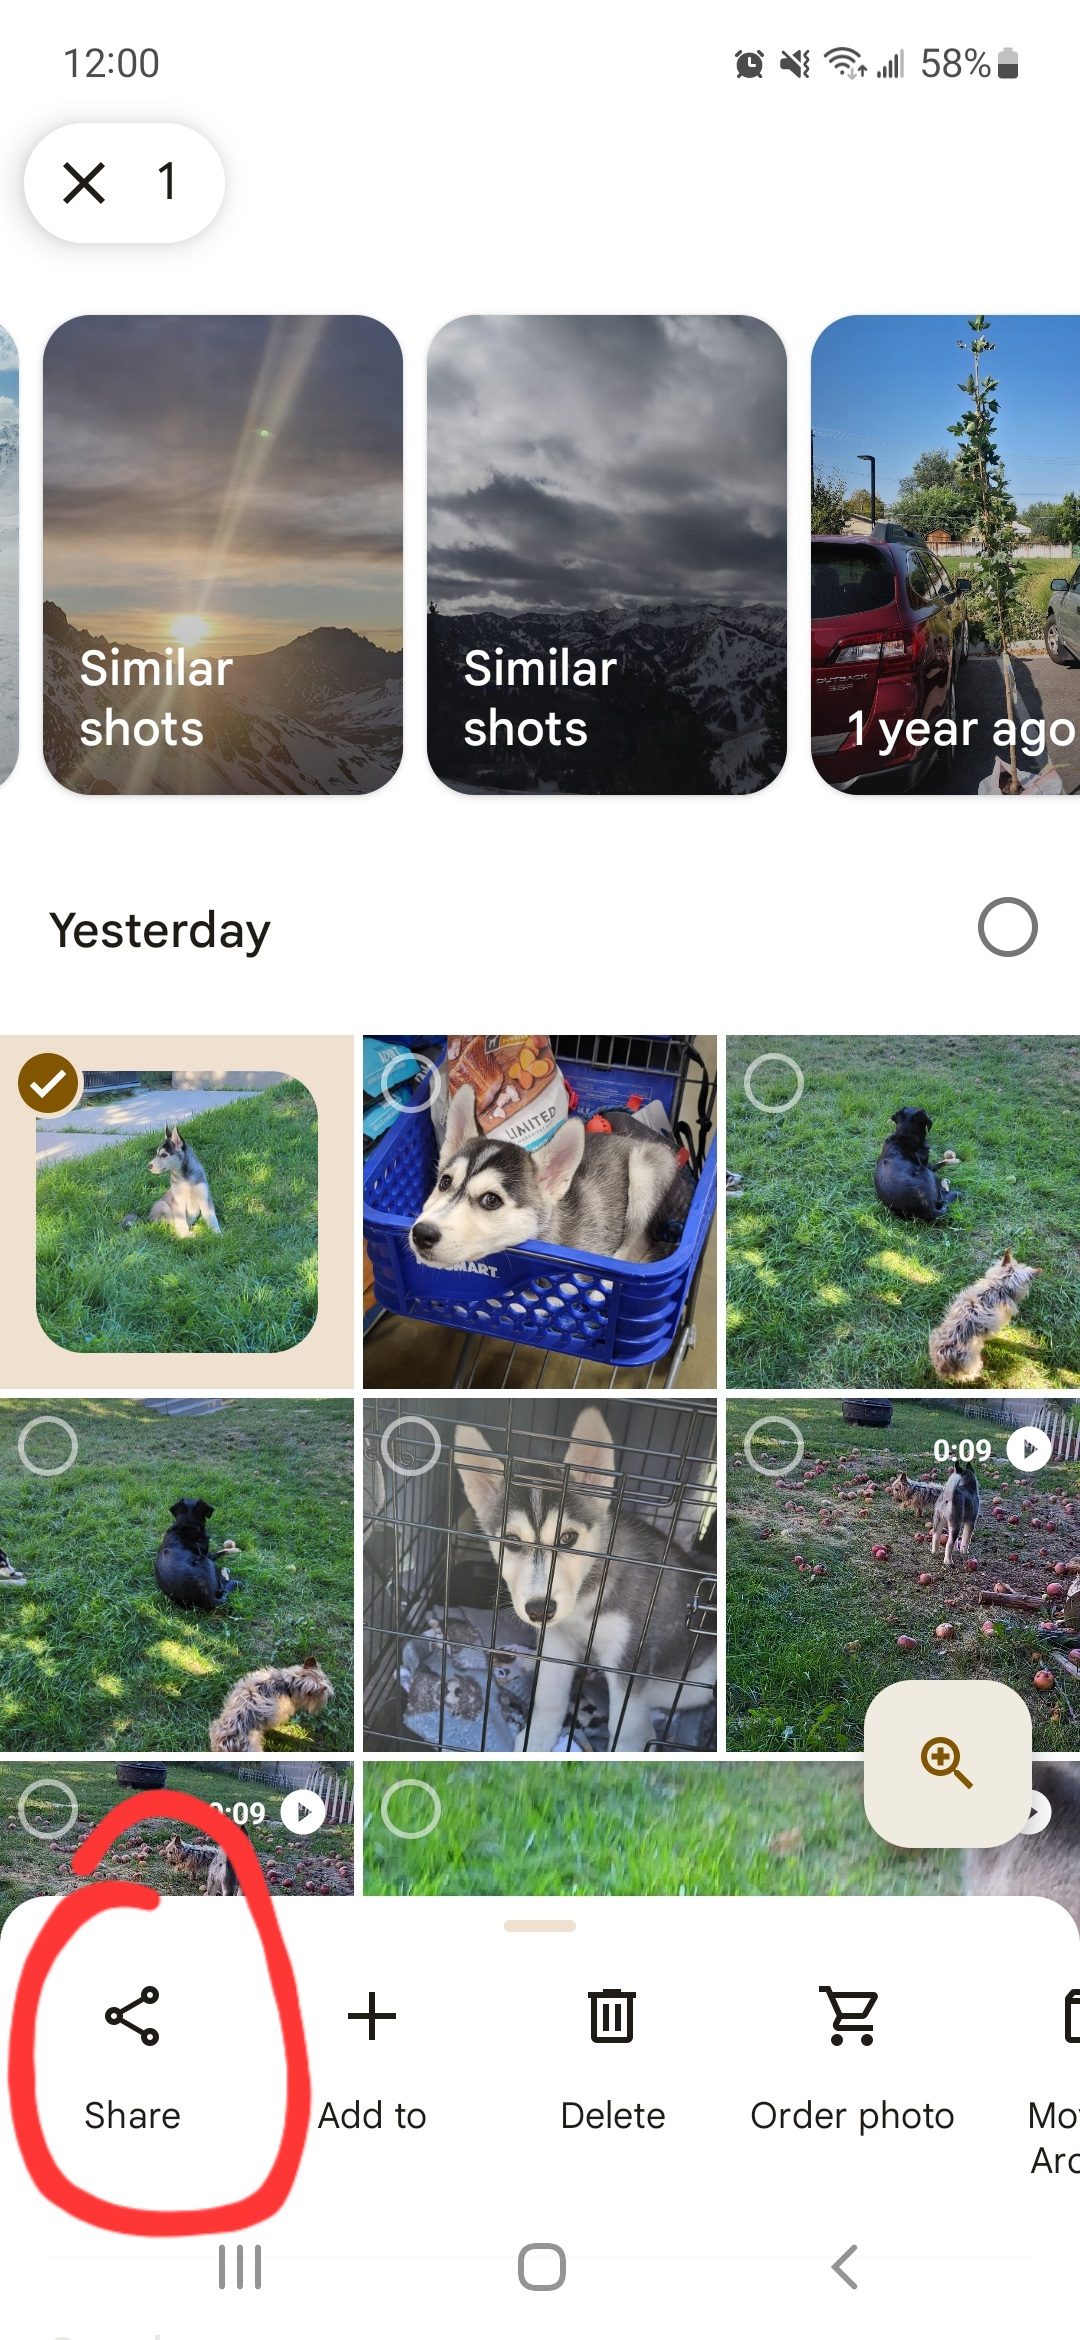
From here you have many options for sharing photos. Choose the best option for you.
If you’d like to see all share options, click the 3 dots and More in the lower right corner.
Sharing Photos and Videos with a Shared Album
A shared album on Google Photos is my favorite feature on the app. There are a few great reasons to use this feature. First reason is collaborating with friends, family, or for business. Say, for example, you are on a vacation with family and friends. Creating a shared album and adding those people to the album allows everyone to upload their images and videos easily. All the files are located in one folder, always. This removes all the extra steps of organizing all your media into one place after the vacation. You can also be the only person adding to the album while allowing other contacts to view the media as you add it. If they like, they can have notifications that are sent to them when you add new media.
Watch this short video on how to create a Google Photos shared album.
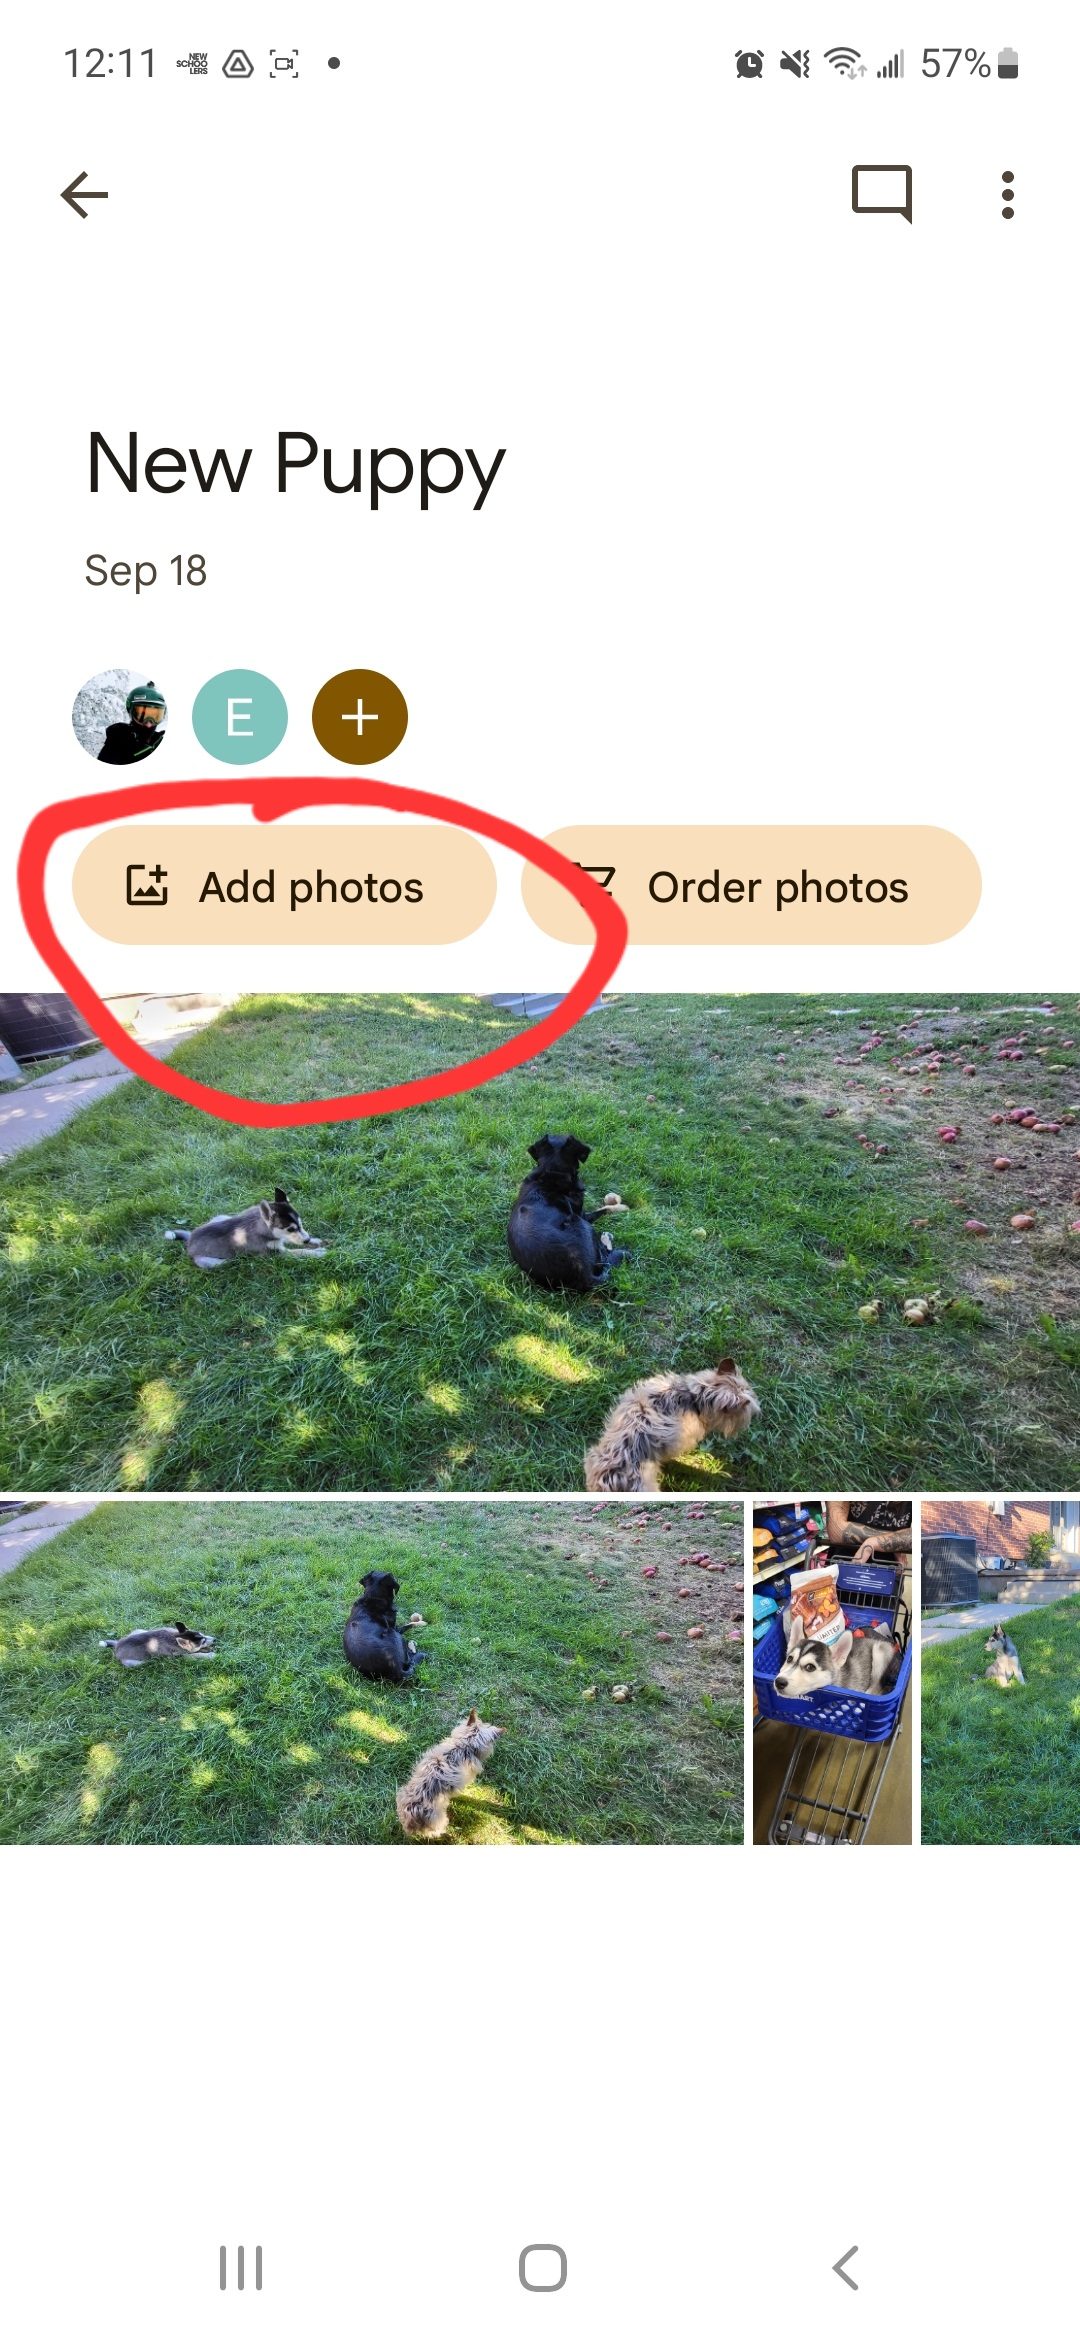
If you’d like to add new media to an existing shared album on Google Photos, go to the app, click the Sharing option on the bottom of the screen, select the album, then click Add photos:
Using the Favorite Feature on Google Photos
If you’re like me, you are taking lots of photos. I take them for work and for personal use. I have thousands of photos and videos. Accessing and seeing my best media is something important to me. Sometimes you edit a photo, or create a movie or collage, etc. But you want to save it somewhere where you know you can find it. This is where "Favorites" comes in handy.
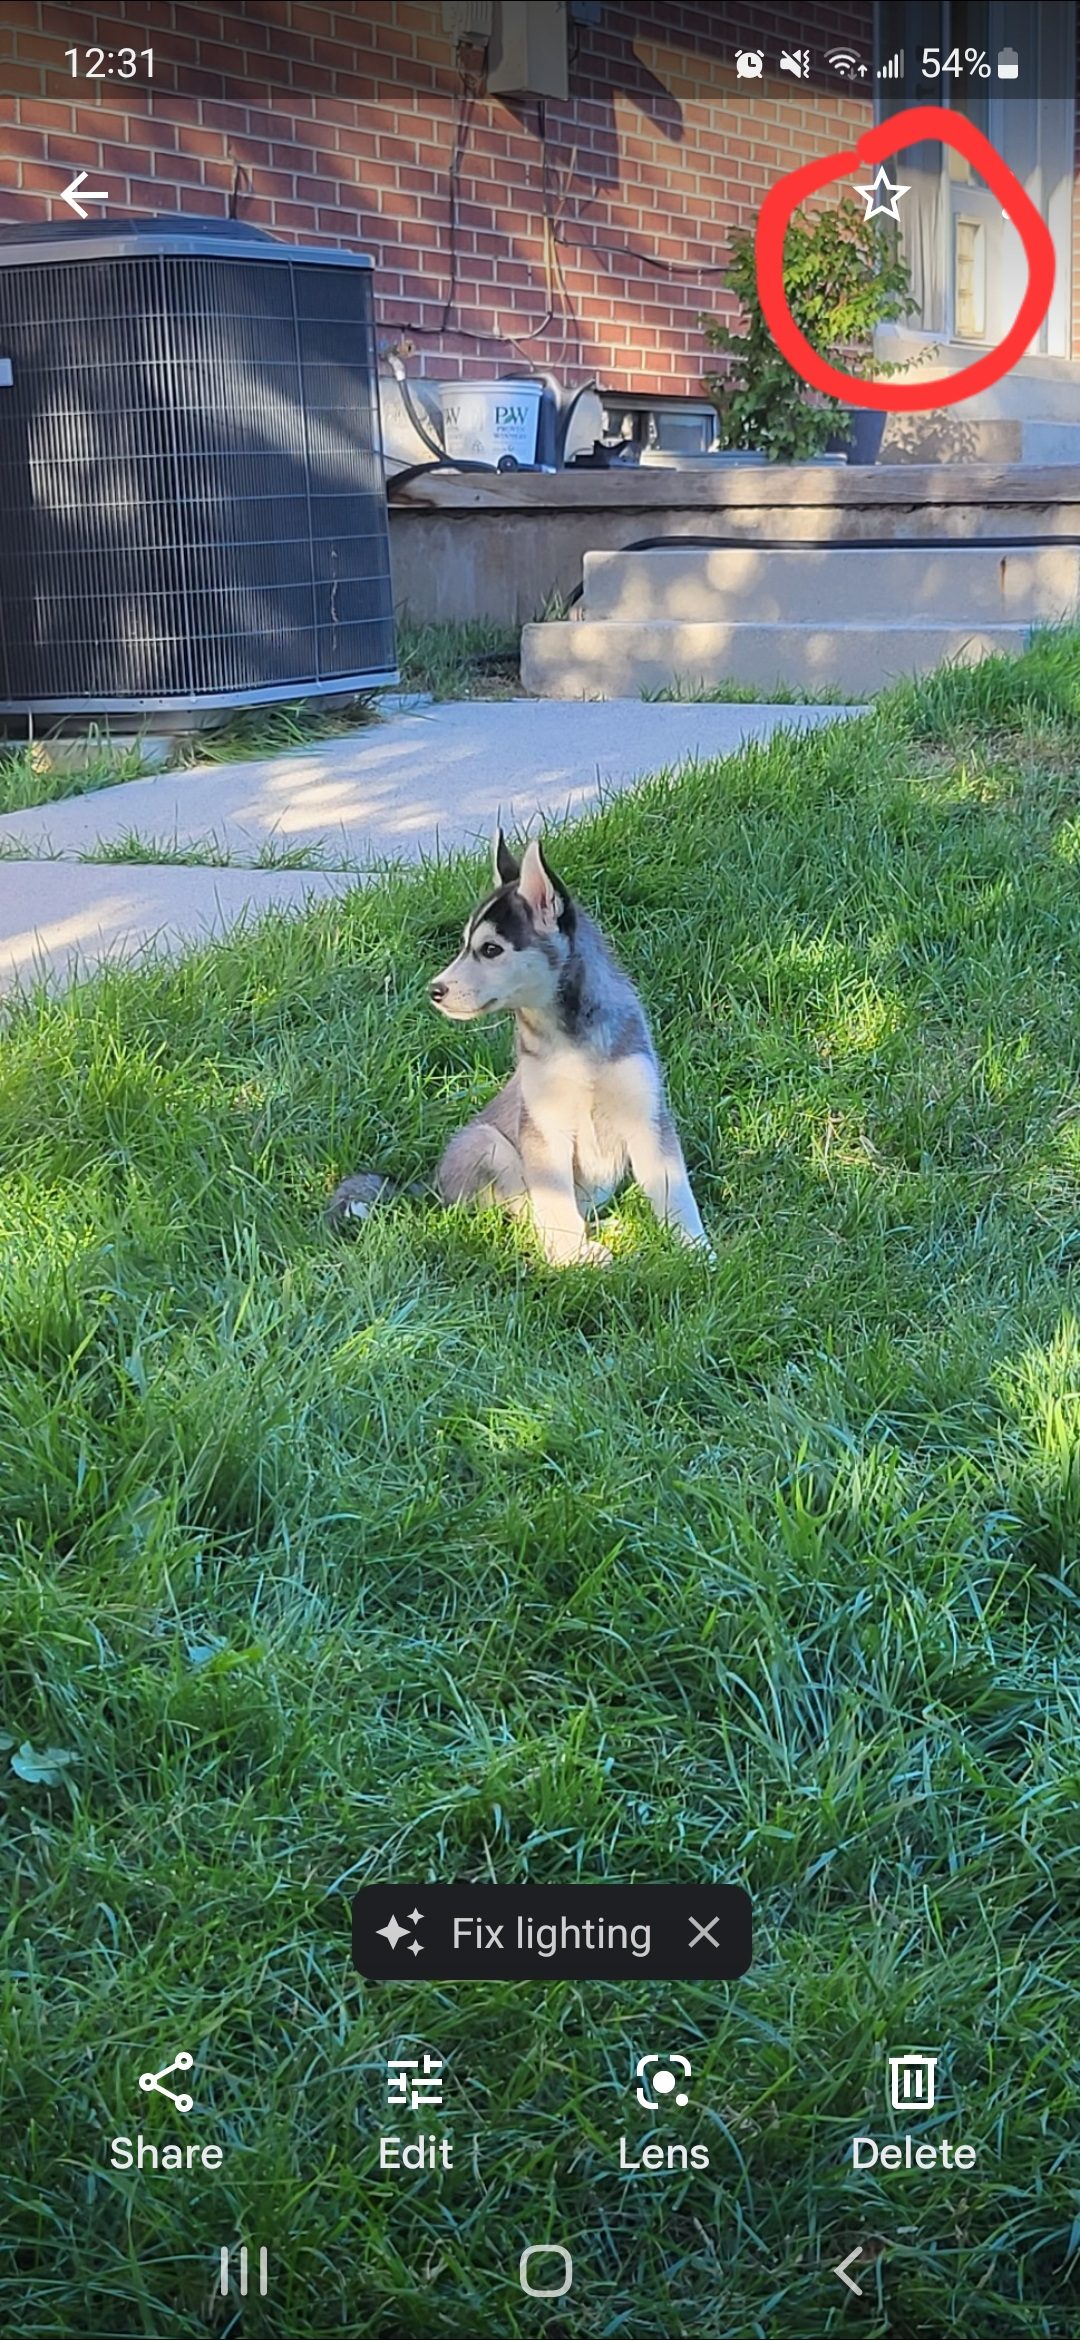
Any media item has a star in the upper right corner. Hit that star to mark the photo or video as a favorite:
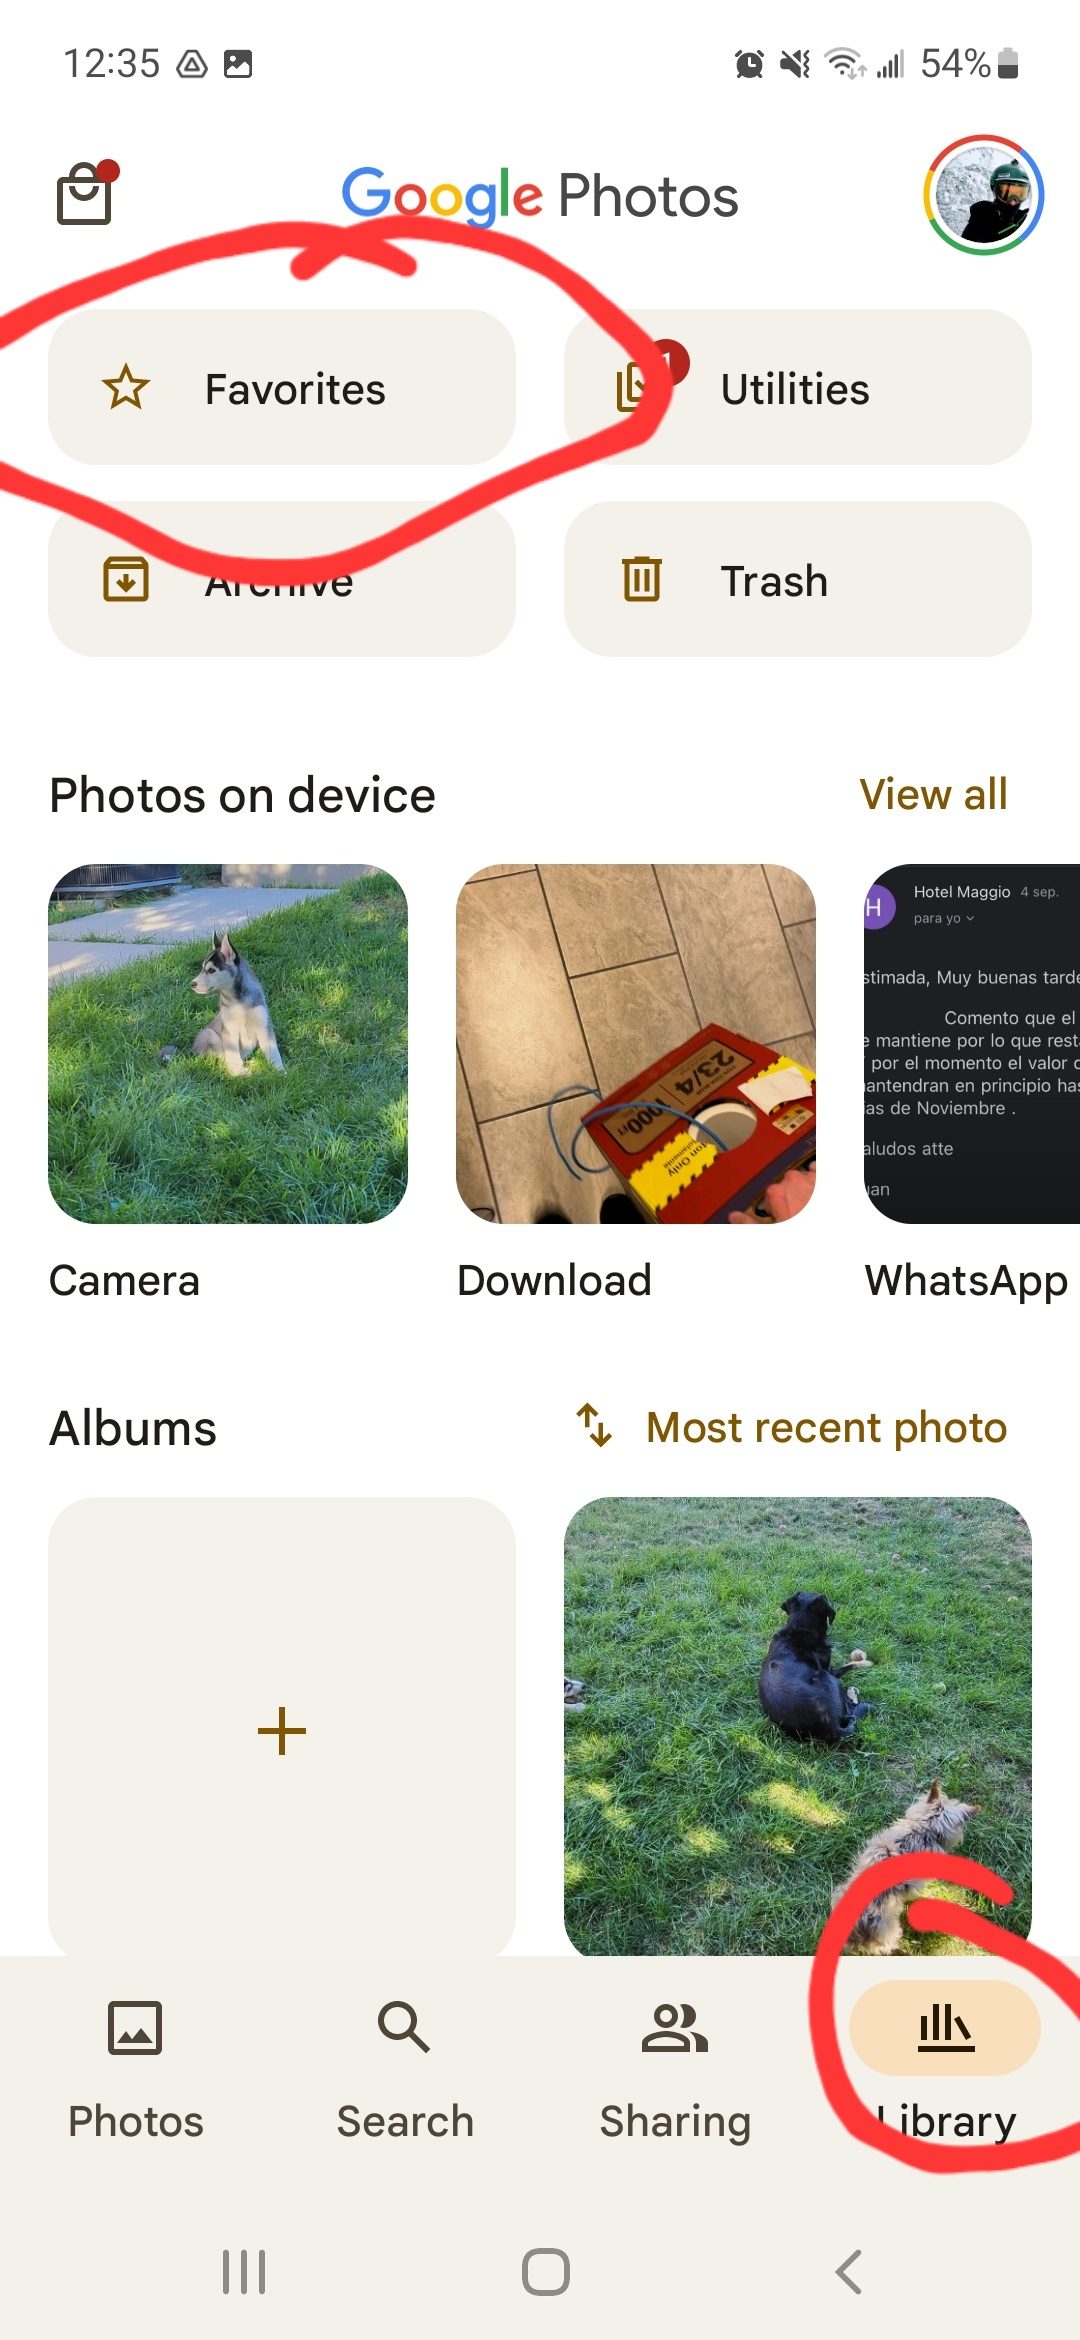
To access this and other Favorites, hit the Library bottom in the bottom right of the app, then click the Favorites folder in the top left:
Using other Google Photos Features
Using the same general steps you can access other really neat features of Google Photos. These include creating or adding to an personal album, creating a movie, animation, or collage. Just hold the image or video, wait until the check mark appears, at the bottom of the screen click the + sign or Add to. Then you can select the respective tool that you want to use.
Don’t forget to archive photos that you don't want to view on the regular. Archiving keeps the photos and you can access them at any time, but are removed from your timeline. I do this for receipts, proof of purchase, medical documents, etc.
The search function on Google Photos is pretty extensive. You can search by keyword, by places, by looking on a map, by objects, by your favorites, and by categories. Be sure to explore and learn this tool. As your photos add up, being able to master the search function makes your older photos easily accessible.
Using Google Photos and Getting HelpCloud Support
Having an app to back up your photos and other media in the cloud is becoming the norm. And for a good reason. Regardless, to a non-digital native there may be a learning curve and some frustrations. While Google Photos is a great app (especially for Android smartphone users), there are some things that aren't intuitive. That’s why with a HelpCloud Tech Support membership, you can reach out 24/7 for help with any tech issue, including issues using any app on your smartphone or tablet. We can also help you download, install, configure and customize this app. We can advise you on what plan is best for you so that you're not overspending.
